
eHallPass Teacher Guide: How to Use the Dashboard, Approve Passes, and Run Reports
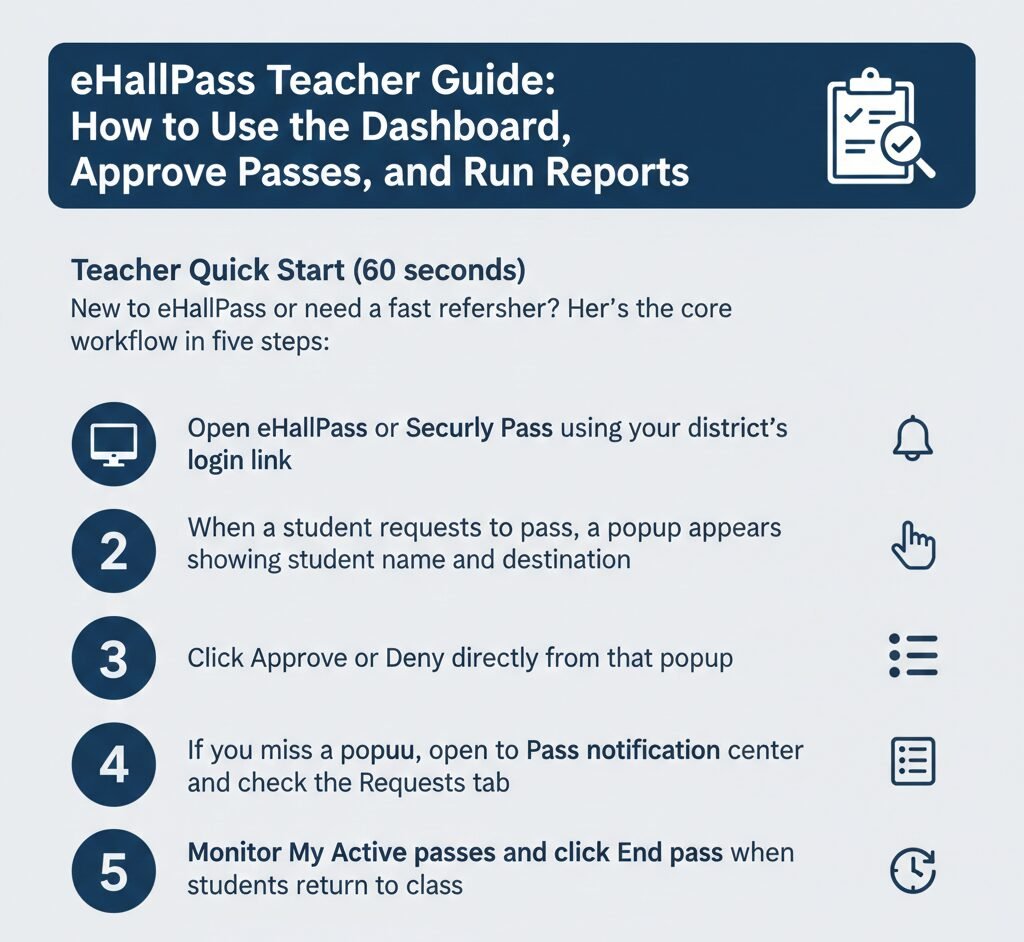
Teacher Quick Start (60 seconds)
New to eHallPass or need a fast refresher? Here’s the core workflow in five steps:
- 1 Open eHallPass or Securly Pass using your district’s login link
- 2 When a student requests a pass, a popup appears showing student name and destination
- 3 Click Approve or Deny directly from that popup
- 4 If you miss the popup, open the Pass notification center and check the Requests tab
- 5 Monitor My Active passes and click End pass when students return to class
That’s it. Everything else in this guide expands on those five steps with verified details from Securly documentation and district implementations.
What eHallPass (Securly Pass) Is for Teachers
Look, I’ll be straight with you—eHallPass is basically the digital version of those paper hall passes you used to write out by hand or sign off on. Instead of interrupting your lesson to hand a student a physical pass, they submit a digital request from their device. You see it on your screen, click Approve or Deny, and the system logs everything automatically.
The system replaces paper workflow entirely. Students request passes digitally. Teachers review and respond from their dashboard or device. Administrators can monitor active passes across the whole school and run reports on pass patterns. It’s designed to reduce classroom disruption while giving schools better visibility into hallway movement.
Teachers can review requests and approve or deny them quickly. Most of the time, a student’s request shows up as a popup on your screen within seconds of submission. You click one button and move on. If you’re in the middle of direct instruction, you can ignore the popup and handle the request later from your notification center.
The system logs destinations and timestamps for every pass. When a student requests a pass, they select where they’re going. When you approve it, the system records the approval time. When the pass ends, it logs the return time. This creates a data trail for safety, accountability, and reporting without requiring you to write anything down manually.
Here’s what most people don’t realize—it does not use device-based location data. Between you and me, there’s a lot of confusion about this. Parents and even some teachers think the system is GPS-tracking students as they move through hallways. It’s not. The vendor documentation explicitly states it does not use device-based location data or any location-tracking software or hardware. What it tracks is the destination the student selected when they requested the pass and the times associated with that pass. Big difference.
What teachers control vs what admins configure
You control the approval workflow. You decide whether to approve or deny each pass request. You monitor active passes for your students. You end passes when students return or when you need to clean up stuck passes. Those are your day-to-day teacher actions.
Admins and district IT configure the rules. They set pass limits per student or per destination. They decide which destinations are available and whether a destination can be marked as closed or full. They control reporting access and configure features like Pass Kiosk, Proxy Pass, and Auto Pass. They also manage user accounts and troubleshoot technical issues.
Why this matters: If a student complains they can’t request a bathroom pass, that’s not a teacher dashboard problem. That’s a district-configured limit or rule. Escalate to your school IT or admin rather than trying to “fix” it from your teacher view.
Inside the Teacher Dashboard and Pass Notification Center
Now, you might be wondering what the actual teacher interface looks like and how you interact with it. Let’s break down the key components.
What happens when a student submits a request
A popup appears on your screen with the student’s name and destination. This is the primary notification method in most deployments. The student clicks to request a pass, selects a destination, submits the request, and your screen immediately shows a small popup window with the details.
What you typically see on that popup: The requesting student’s name, the destination they selected, and possibly additional details like pass type or expected return time depending on how your district configured the system. The exact fields vary by school setup, but student name and destination are always present.
You don’t need to be staring at your dashboard to see these popups. They appear on whatever screen you’re currently using, whether that’s your lesson plan, a gradebook, or even a browser with unrelated tabs open. That’s the whole point—immediate notification without requiring you to check a separate app constantly.
Pass notification center overview
The Pass notification center is your hub for all pass-related activity. It lists both incoming requests and currently active passes that you’re involved in. Think of it as a centralized inbox for pass management.
When there’s a pending request, a red dot appears on the notification center button. This gives you a visual indicator even if you dismissed or missed the popup. You’ll know at a glance whether you have pending actions waiting.
The notification center has two main tabs: Requests and My Active passes. Each serves a specific purpose in your workflow.
Requests tab
Pending pass requests appear in the Requests tab. If you closed a popup without acting on it, the request doesn’t disappear. It sits in this tab waiting for you to approve or deny it when you’re ready.
You can interact with any request from this tab. Hover over a request to see available actions, then click to approve, deny, or cancel it. This is your fallback when the popup workflow doesn’t fit the moment—like when you’re helping a student one-on-one and don’t want to break focus to handle a popup.
In our experience, teachers use the Requests tab most often during tests or focused instruction. You don’t want popups interrupting a quiz, so you dismiss them and come back to the Requests tab afterward to batch-process several pending requests at once.
My Active passes
This section shows details for passes that are currently active. If you approved a pass five minutes ago and the student is still out of the classroom, you’ll see that pass listed here with timing information and destination.
You can see passes where you’re the destination teacher, depending on your district’s setup. For example, if you’re a guidance counselor and students are coming to your office from other teachers’ classes, those passes might appear in your Active passes view so you know who’s on their way.
This is where you monitor who’s out right now during class. Quick glance at My Active passes tells you how many students are out, where they said they were going, and how long they’ve been gone. Useful for safety, classroom management, and catching patterns like students taking unusually long bathroom breaks.
How to Approve or Decline Pass Requests
Here’s the thing though—the approval process is simple in theory but understanding all your options makes you more efficient in practice.
Approve or deny from the popup
Student submits: A student requests a pass by selecting a destination on their device.
Popup appears: Your screen shows the student’s name, destination, and other details.
Action: Click Approve or Deny. The student is notified, and the session is logged.
Most teachers handle 90% of requests this way. It’s fast, interrupts your workflow minimally, and students get near-instant responses when you’re available to approve.
If you closed or ignored the popup
The request doesn’t disappear if you close the popup. It moves to the Requests tab in your Pass notification center and waits for you there. You can approve or deny it later without the student needing to resubmit.
Why would you ignore a popup? Maybe you’re giving direct instruction and can’t break focus. Maybe you’re helping a student with a complex question. Maybe you’re on a video call with a parent. The system accommodates that by queuing requests in the notification center.
Open the notification center and click the Requests tab to see all pending requests. Hover over any request to reveal action buttons, then approve or deny as appropriate.
What teachers typically see on a request
Student name and destination are always shown. These are the core data points you need to make an approval decision.
Depending on district setup, you might also see: Pass type (bathroom, nurse, office, locker), expected return time or duration, reason for the request, or how many passes the student has used today. Not every district enables all these fields, so your view might differ from another school’s.
Honestly, this drives us crazy because teachers compare notes across districts and get confused. One teacher says “I see a countdown timer on every pass” and another says “I’ve never seen that feature.” Both are correct—it just depends on local configuration.
How to End or Close a Pass
Look, I’ll be straight with you—this is the step teachers forget most often, and it causes more downstream problems than you’d think.
End an active pass
- Navigate to your My Active passes section. You’ll see a list of currently active passes with student names, destinations, and elapsed time.
- Hover over the pass you want to end. A button or action appears, typically labeled “End pass” or something similar.
- Click End pass. The system logs the end time, updates the student’s pass history, and removes the pass from your active list. Done.
Ending passes keeps data accurate
Why end a pass manually? Because accurate data matters for safety and reporting. If you don’t end a pass when a student returns, the system thinks the student is still out. That creates “ghost passes” in the data, which confuse administrators running reports and create false positives during emergency roll calls.
Ending a pass takes two seconds. Hover over the active pass in your My Active passes section and click the End pass button. The pass closes, the timestamp logs, and the student’s daily pass count updates.
In our experience, teachers who consistently end passes have fewer issues with students “gaming the system.” When students know you’re monitoring closely and closing passes accurately, they’re less likely to abuse pass privileges or take unnecessarily long trips.
Common “end pass” scenarios
- Student returned early from their destination. End the pass as soon as they sit down so your active pass count stays accurate.
- Student went to the destination and came back on time. This is the normal flow. End the pass when they return to avoid inflating your active pass count.
- A pass is stuck “active” and needs cleanup. Sometimes a student forgets to check in at a kiosk. You notice it hours later—end those stuck passes manually.
- End-of-period cleanup. Some teachers scan their My Active passes at the end of each period and close any passes that should have ended but didn’t.
Admin Controls Teachers Should Understand
Now, you might be wondering why certain students can’t request passes or why a destination shows as unavailable. Understanding admin-configured rules helps you answer those questions.
Pass limits and destination rules
Limits can be set by student or by location. An admin might configure a rule like “no more than three bathroom passes per student per day” or “maximum of two students in the guidance office at once.” These limits apply automatically when students try to request passes.
The system checks if a destination is closed or full before allowing the pass. If the guidance office is at capacity or if a bathroom is temporarily closed for cleaning, the system blocks new requests to that destination and notifies the student. You don’t need to manually track this—it happens automatically based on admin settings.
If a student complains “it won’t let me request a pass,” check their daily count first. They might have already hit their limit. If not, the destination might be closed or full. Either way, these are district policy issues, not teacher dashboard problems.
Appointment scheduling
eHallPass can streamline appointment scheduling for teachers according to vendor documentation. The exact implementation varies by district, but the concept is that counselors, nurses, or other staff can pre-schedule appointment passes for students, which then appear in the student’s dashboard at the scheduled time.
This is particularly useful for recurring appointments like weekly counseling sessions or students who need to take medication at specific times each day. The system handles the scheduling automatically rather than requiring the student to request a pass every time.
As a classroom teacher, you might see these appointment passes differently from regular passes in your notification center. Some systems label them or color-code them so you know the pass was pre-scheduled and approved by staff rather than spontaneously requested by the student.
Pass Kiosk, Auto Pass, and Proxy Pass
Here’s what most people don’t realize—eHallPass has several specialized pass types designed for specific situations. Not every district uses all of them, but they’re worth understanding.
Pass Kiosk
Pass Kiosk provides request and check-in access to students without devices. If your school doesn’t issue devices to every student or if some students forget their Chromebooks at home, they can use a shared kiosk to request passes.
Typically these kiosks sit in common areas like hallways or near main offices. A student walks up, enters their credentials or scans a badge, requests a destination, and waits for approval just like they would from a personal device.
Teachers see kiosk requests the same way they see device-based requests. The popup or notification center entry looks identical—you approve or deny without needing to know whether it came from a kiosk or a student laptop.
Proxy Pass
Proxy Pass lets teachers create passes when students don’t have a device. Instead of the student requesting the pass from their account, you create it on their behalf from your teacher dashboard.
Common use cases: A student’s device died mid-class, a kindergartner who doesn’t have a device at all, an emergency situation where a student needs to leave immediately without fumbling with login credentials.
You create the proxy pass by selecting the student, choosing a destination, and submitting. The system logs it as a teacher-created pass rather than a student-requested pass, but the workflow for monitoring and ending it is identical.
Auto Pass
Auto Pass allows students to check themselves in and out without disrupting class. Think of it as pre-approval for certain destinations under certain conditions. A student clicks to activate an auto pass, leaves the room, returns, and closes the pass—all without requiring real-time teacher approval.
This is controversial in some schools because it reduces teacher oversight. It can vary, but typically districts configure auto pass for low-risk situations like quick bathroom trips during independent work time.
Availability and rules for all three features depend on district configuration. Your school might use all of them, none of them, or some combination. Check with your school’s eHallPass administrator or IT coordinator to understand what’s enabled in your deployment.
Reports and Analytics for Teachers and Admins
Between you and me, this is where eHallPass becomes powerful beyond just “digital hall pass.” The reporting capabilities give schools data-driven insights into student movement patterns.
Custom Reports
Custom Reports let admins generate reports about who is requesting and granting passes. You can pull reports showing pass frequency by student, by destination, by time of day, by teacher, or combinations of those filters.
Example use cases: Which students request the most passes each week? Which destinations are busiest during third period? The system logs all this data automatically and makes it available through reporting.
Teachers typically have limited report access compared to admins. You might see reports for your own classes and students, but you probably can’t pull school-wide data or compare your approval patterns against other teachers.
Identify patterns
One of the most valuable reporting capabilities is identifying students who are out of class for extended periods. An admin can run a report showing students who take passes longer than 15 minutes, students who leave class during the same period every day, or students whose bathroom pass frequency has suddenly increased.
This data helps catch problems early. A student consistently taking long passes might be dealing with a medical issue that requires accommodation. A student who leaves class every day at the same time might be avoiding a specific subject or peer situation. Patterns reveal issues that individual teachers might not notice when they only see their own class periods.
What report access varies by role
- Teacher access typically includes: Pass history for students in your classes, your own approval/denial statistics, active pass status for your current period.
- Admin access typically includes: School-wide pass data, destination usage reports, comparative analytics across teachers or grade levels, historical trend analysis over weeks or months.
Check with your school to understand your specific permissions. Some schools give teachers more reporting access than others, and it often depends on your role.
Privacy and Tracking: What Teachers Can Say (Verified)
Honestly, this drives us crazy because there’s so much misinformation floating around about what eHallPass does and doesn’t track. Let’s get this clear based on vendor documentation.
What’s tracked
The system logs when passes are granted, what destination students say they’re going to, and arrival timing where available. Those three data points create the audit trail: approval timestamp, selected destination, and when the pass ended.
Some districts configure check-in/check-out at destinations using kiosks or student devices. When enabled, this adds a layer showing the student “arrived” at the stated destination. But this requires the student to actively check in—it’s not automatic location detection.
What is NOT used
eHallPass does not use device-based location data or any location-tracking software or hardware. This is stated explicitly in the vendor’s product documentation. It does not use GPS. It does not triangulate student positions through Wi-Fi. It does not track students’ physical movement through hallways.
What students select as their destination is what gets logged. If a student says they’re going to the bathroom but actually stops at their locker, the system doesn’t detect that discrepancy unless someone physically observes it or the student checks in at the wrong destination.
When parents or students express concerns about “being tracked,” you can clarify this distinction. The system tracks pass requests and stated destinations, not physical locations.
Troubleshooting for Teachers
Most of the time, eHallPass works smoothly. When it doesn’t, here’s how to troubleshoot the most common issues.
I didn’t see the popup
First, check your Pass notification center and open the Requests tab. The request should still be there waiting for you even if the popup never appeared or if you accidentally closed it.
If the request isn’t in your notification center either, the problem might be that the student’s request never reached you. Ask the student to try submitting again. If it fails repeatedly, escalate to school IT.
Check your browser settings to make sure popups aren’t blocked for your school’s eHallPass domain. Some teachers accidentally click “block popups from this site” and then wonder why they stop seeing pass requests.
Requests aren’t showing or showing for the wrong class
Confirm you’re signed into the correct teacher account. In schools where teachers share devices, it’s possible to accidentally stay logged in as a colleague or a test account.
Verify your class roster is correct in the system. If students aren’t properly assigned to your class in your district’s student information system, their pass requests might not route to you. This is an admin-level fix.
If requests from your students are going to another teacher, that’s also a roster/configuration problem. Don’t try to troubleshoot it yourself. Open a ticket with school IT describing the symptoms.
Active passes not updating
Try refreshing your browser or closing and reopening the Pass notification center. Sometimes the display goes stale but a simple refresh pulls the current data.
If active passes remain stuck after manual refresh, contact your school IT or district help desk. There might be a backend sync issue that requires technical troubleshooting beyond what teachers can do from the UI.
Log out and log back in if refresh doesn’t work. This forces a fresh authentication and often resolves display issues caused by expired session tokens.
Teacher and Admin FAQ (Verified and Safe)
When a student requests a pass, a popup appears showing the student’s name and destination. Click Approve or Deny. If you missed the popup, open your notification center and go to the Requests tab.
Open the Pass notification center on your dashboard. Go to the Requests tab. A red dot on the notification center button indicates pending items.
Go to the My Active passes section in your notification center. Hover over the pass and click the End pass button to log the return and update history.
Check the My Active passes section. It shows current students out, their destination, and how long they’ve been gone.
No. The system tracks pass requests and stated destinations, not physical location. Vendor documentation confirms it does not use GPS or Wi-Fi triangulation.
They show pass frequency by student, destination, or time of day. They help identify patterns and ensure school-wide accountability.
A shared terminal for students without personal devices to request or check in for passes.
A feature that lets teachers create a pass on behalf of a student who cannot access their account or device.
Contact your school’s IT department for login or dashboard errors. For pass limits or rules, contact your school’s eHallPass administrator.
Need more help?
Check out our related guides: eHallPass Student Guide, eHallPass Login, eHallPass Password Reset, and eHallPass SSO Login.